Diferencia entre revisiones de «Pantalla de juego»
| Línea 108: | Línea 108: | ||
=== Display de daños === | === Display de daños === | ||
| − | [[image:DamageExplanation.jpg|thumb| | + | [[image:DamageExplanation.jpg|thumb|Display de daños]] |
<font style="color:gray">'''[F10]'''</font> El display de daños muestra si una de las partes de la suspensión está dañada. Una barra naranja marca el daño. La barra naranja larga es que está dañada la suspensión. Una barra roja significa que una parte de la suspensión está totalmente rota - Pero ya habras notado esto por el comportamiento del coche. | <font style="color:gray">'''[F10]'''</font> El display de daños muestra si una de las partes de la suspensión está dañada. Una barra naranja marca el daño. La barra naranja larga es que está dañada la suspensión. Una barra roja significa que una parte de la suspensión está totalmente rota - Pero ya habras notado esto por el comportamiento del coche. | ||
| − | '''UPR:''' Representa el daño del puntal superior. Esto significa que el brazo de la suspensión está | + | '''UPR:''' Representa el daño del puntal superior. Esto significa que el brazo de la suspensión está doblado/corto, disminuyendo así su [[Advanced_Setup_Guide#Camber_Adjust|curvatura]] (más negativo). |
| − | '''LWR:''' | + | '''LWR:''' Muestra el daño de la barra inferior, incrementando la curvatura (más positivo). |
| − | '''TOE:''' | + | '''TOE:''' Muestra el daño de tu [[Advanced_Setup_Guide#Toe_In|toe in/out]] setting. The orange bar illustrates in which direction the front of the corresponding tyre is pointing to. If the orange bar on the left suspension damage display points to the right, then you have more toe in, if it points to the left, you have more toe out. Vice versa for the right suspension damage display. |
'''Spring/Damper damage:''' Shows how intact your [[Advanced_Setup_Guide#Bump_.26_Rebound_Damping|damping]] is. If the bars become red, the damping failed completely, which you will immediately notice because your car will be jumping all over the place. | '''Spring/Damper damage:''' Shows how intact your [[Advanced_Setup_Guide#Bump_.26_Rebound_Damping|damping]] is. If the bars become red, the damping failed completely, which you will immediately notice because your car will be jumping all over the place. | ||
Revisión de 17:19 14 jul 2010
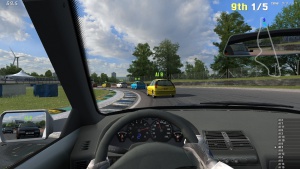
Para poder jugar correctamente en Live For Speed es vital que te acostumbres al salpicadero, indicadores y a la información de la pantalla. Los indicadores pueden ser configurados y personalizados en el menú DISPLAY en las opciones. Pulsando Shift+F puedes cambiar entre la diferente cantidad de información mostrada en pantalla.
En pantalla
El mapa del circuito: En el mapa del circuito puedes ver tu posición y la de los otros jugadores. Si estás en carrera los colores representan esto:
- Verde: Tu coche
- Amarillo: Oponente humano por delante de ti
- Amarillo pálido: Oponente humano que te ha doblado ya (que te ha sacado una vuelta de ventaja)
- Naranja: Oponente humano por detras de ti
- Naranja oscuro: Oponente humano al que ya has doblado (que le has sacado una vuelta de ventaja)
- Azul claro: Oponente IA por delante tuyo
- Azul oscuro: Oponente IA por detras tuyo
Si estas en clasificación representan lo siguiente:
- Verde: Tu coche
- Amarillo: Oponente humano que va en vuelta rápida
- Naranja: Oponente humano que esta en vuelta lanzada (que en esa vuelta no esta haciendo tiempos porque acaba de salir de box)
- Azul claro: Oponente IA que va en vuelta rápida
- Azul oscuro: Oponente IA que va en vuelta lanzada
Nota: Los colores son configurables, se han descrito los colores que se usan por defecto.
FPS display: El display de FPS muestra cuantos frames por segundo son dibujados. Este númro no deberia bajar de 30, puedes hacer que aumenten si reduces la calidad de los gráficos del LFS en opciones o bajando la resolución.
Posición: El número amarillo de la derecha muestra tu posición en carrera o clasificación (en entrenamiento no hay posiciones). Este número puede ser erroneo si la gente que ya ha terminado la carrera abandona la pista, por lo que no te alarmes si caes posiciones al terminar la carrera respecto a lo que indicaba ese número. Este número se vuelve naranja (por defecto) cuando la carrera o clasificación ha acabado.
Vueltas: 2/5 Te dice que estas en la segunda vuelta de cinco que dura la carrera. Durante las clasificaciones o las práticas uicamente se muestra en número de vueltas que llevas. Este número se vuelve naranja (por defecto) cuando la sesión finaliza.
IMPORTANTE: En una carrera por tiempo el contador se vuelve naranja cuando se alcanza el tiempo de carrera establecido. Sin embargo, la carrera no termina hasta que el 1º no cruza la meta. En una clasificación se termina de contar el tiempo de la vuelta que estes dando aunque se te acabe el tiempo mientras la haces.
Total: La duración total de la carrera.
Clasificación: Solo mostrado en sesiones de clasificación, muestra el tiempo que te queda para clasificar. Cuando se acaba el tiempo se vuelve naranja y esto quiere decir que la vuelta en la que estás sera la última que se cuenta.
Mejor: Muestra tu vuelta más rapida desde que saliste de boxes o comenzó la carrera.
Vuelta: El tiempo de la vuelta actual.
Sector: El tiempo que marcaste al pasar por el último sector.
Pedales:
- Verde: Accelerador - Este es el indicador de la mariposa de gases del accelerador y no la posición del pedal. Aunque la mayoría del tiempo son iguales.
- Rojo: Freno - Esto indica la posición del pedal de freno.
- Azul: Embrague - Muestra la posición del pedal del embrague.
- Gris: Freno de mano - Muestra cuanto se ha tirado del freno de mano.
Volante virtual: En la vista exterior o personalizada, el punto rojo indica hacia donde giras y el punto negro hacia donde se tiende a ir el coche.
Salpicadero
Tacómetro: El indicador de la izquierda muestra las RPM. En coches de carreras se enciende un indicador de cambio de marcha, esta se prende para indicar el momento idoneo de cambio para que al subir de marcha, las revoluciones caigan a una zona de la curva de potencia que ofrezca en mejor rendimiento al cambiar.
Indicador de marcha: Muestra la marcha en la que estas.
Velocimetro: La velocidad, en MPH o KM/H. Se muestra en analógico en los turismos y digital en los coches de carreras.
Indicador de la presión del turbo: Los coches turbocargados tienen un indicador que muestra la presión del aire que el turbo esta metiendo al motor respecto a la atmosférica. Cuando la presión es baja el motor tiene menos potencia (entra menos mezcla de gasolina y aire al motor de lo que haria con el turbo a alta presión)
Temperatura del agua: Este indicador todavía no funciona. Por lo que no sirve para nada.
Indicador de la presión del aceite: Este indicador muestra la cantidad de aceite que circula por el motor, a mas revoluciones, más pasa porque es proporcional a la velocidad del cigueñal del motor, por lo que en cierto modo parece un tacómetro.
Indicador del combustible: Muestra cuanto combustible te queda. El porcentaje exacto se puede ver al pulsar F12
Reloj: Algunos coches tienen reloj que muestra la hora del sistema.
Intermitentes: Unas flechas verdes indican los intermitentes, si están prendidos o no.
Luces / flash: Un simbolo de un foco azul indica que vas con las luces encendidas.
Freno de mano: Si el freno de mano esta activado se indica con una exclamación roja en un circulo en coches de calle, con una luz roja en los de carreras.
Limitador de velocidad: En los coches equipados con este accesorio, cuando esta activado el limitador se prende una luz verde.
Control de tracción (TC): En los coches equipados con TC, cuando este esta activo suele estar apagado y prenderse cuando entra en funcionamiento. Si permanece prendido es que está desactivado. Se representa con un simbolo amarillo en una exclamación que no debe confundirse con el ABS.
Sistema de antibloqueo de frenos (ABS): En los coches equipados con ABS, cuando este esta activo suele estar apagado y prenderse cuando entra en funcionamiento. Si permanece prendido es que está desactivado. Se representa con un simbolo amarillo de un círculo entre paréntesis,no debe confundirse con el TC.
Displays adicionales
F9 F10 F11 F12
Usando las teclas del F9 al F12 puedes ver 4 displays con informción.
F9: Temperatura de las ruedas y del embrague.
F10: Estado de la suspensión (daños).
F11: Cambios en el setup que pueden ser hechos mientras conduces.
F12: Estrategia de boxes.
Pulsando el mismo botón otra vez se cierra la ventana.
Temperatura de las ruedas, desgaste de estas y temperatura del embrague
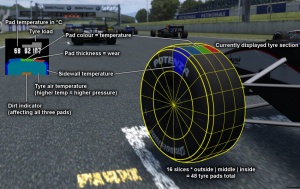
[F9] El display F9 muestra cuatro ventanas pequeñas que contienen un perfil en 2 Dimensiones con números y 3 barras grises.
There are six areas in the diagram - three contact patches, the sidewalls and the air temperature. Each area goes from dark blue (cold) through green (ideal) and into red (overheated). There is also black, but that is only shown inside the tire after a blowout or puncture. Above the tyre diagram, there is a set of three numbers, which give the exact temperature of that tyre part. However, these numbers only represent the average temperature of the whole contact patch (from the inside up to the surface) - if you press and hold Ctrl+Shift, you can see the the actual surface temperature, which rises and falls much more quickly during a race. Bear in mind that since the tyre diagram only shows the top section of the corresponding tyre, a 'flat spot' on a spinning wheel is represented by little flashes of red.
If the tyre diagram changes its colour to orange, it means that ABS is active and is preventing the wheel to lock.
At the top of each window there is a set of moving grey bars showing the footprint pressure of the tyre on the road. The display gives a good idea of how much camber (lean) the wheels have at any given point in time. With most cars there is a change in camber when the body rolls in a corner, but in order to find the most grip the wheel needs to be upright (relative to the road surface), when the bars are level the wheel is vertical to the road.
Last but not least we have a little brown bar that appears inside the tyre diagram, this brown bar refers to the amount of dirt on the tyres. Dirt reduces grip by a huge amount and therefore you should be more careful after a even a tiny 'off' - it can take a few corners to clean your tyres up again.
The F9 display also shows a small bar labelelled "CT". This indicates the temperature of the clutch. Initially, the bar is orange, but then turns to red as the clutch temperature increases
Display de daños
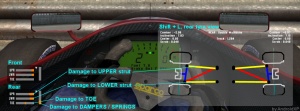
[F10] El display de daños muestra si una de las partes de la suspensión está dañada. Una barra naranja marca el daño. La barra naranja larga es que está dañada la suspensión. Una barra roja significa que una parte de la suspensión está totalmente rota - Pero ya habras notado esto por el comportamiento del coche.
UPR: Representa el daño del puntal superior. Esto significa que el brazo de la suspensión está doblado/corto, disminuyendo así su curvatura (más negativo).
LWR: Muestra el daño de la barra inferior, incrementando la curvatura (más positivo).
TOE: Muestra el daño de tu toe in/out setting. The orange bar illustrates in which direction the front of the corresponding tyre is pointing to. If the orange bar on the left suspension damage display points to the right, then you have more toe in, if it points to the left, you have more toe out. Vice versa for the right suspension damage display.
Spring/Damper damage: Shows how intact your damping is. If the bars become red, the damping failed completely, which you will immediately notice because your car will be jumping all over the place.
Live settings
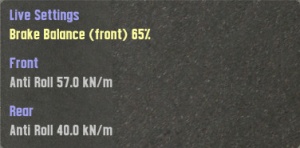
[F11] This display allows for some on-the-fly changes to your current car setup. Included are brake balance and front/rear anti-roll bars.
Note: The changes made on this display are applied (almost) immediately! So better don't fool around with the brake balance when approaching that tricky hairpin. Furthermore, not all cars can adjust all three settings. The RaceAbout, for example, has no rear anti-roll bar.
Pit instructions
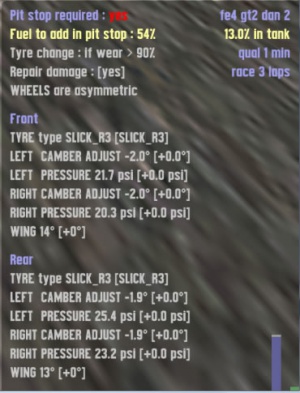
[F12] On the pit instructions display, you can set up what actions should be taken while doing a pitstop. Additionally, there is a fuel display and other generic information, for example if a pitstop is required (by racing rules) or not. At the top right corner, the name of the setup you are using is displayed.
The values displayed in the square brackets [] indicate the difference to the current setting. For example, if you currently have 5° front wing and change it to 8°, the bracketed value will read [+3°]. As soon as you do your pitstop, the changes will be applied and the value reset to [+0°]. For most setup changes, you will need to repair any damage you have incurred before the pitstop for the changes to be applied. This will happen automatically. For this reason you should take into account whether your damage will delay your pistop for long enough to cancel out the speed you will gain by changing your setup.
The change instructions include:
Fuel to add at Pit Stop: Sets the amount of fuel that will be added in the pitstop. This ranges from 0% to 100% and will fill the tank to a maximum of 100%.
Tyre change if wear > X%: Sets the amount of how much a tyre must be worn before it will be changed. If you set it to 10%, then even a slightly worn tyre will be changed, if set to 90% the tyre must have almost no tread left before it gets replaced. LFS will only replace the tyres that fit this criteria. You will need to be careful that some tyres on your car may not be changed if you have set this percentage incorrectly. If this is set to 'always', all of the tyres will be changed regardless of wear.
Repair Damage: Boolean field. [Yes] will repair all damge, [No] will repair none.
Wheels are symmetric/asymmetric: Defines wether you want to edit the front/rear wheels in a symmetric fashion or not. If you choose asymmetric, you can also edit the left/right side independendly.
Tyre type: Change this if you want to mount a different type of tyres. See tyre types for more information.
Camber adjust: See camber adjust.
Pressure: Sets the tyre pressure.
Wing: (only on cars with downforce) Sets the angle of your wings. See downforce.
Please note that depending on the car you drive, some of the options seen on the screenshot might not be available. For example, on non-downforce cars, there is of course no wing adjustment.
G-Forces
At the bottom of the screen right in the middle you will see figures showing the actual lateral and longitudinal acceleration. Lateral acceleration is on the left and a small triangle shows if the acceleration is to the left or the right side. The longitudinal acceleration is on the right side and a triangle shows the direction of the acceleration here too.
Race position list
Shows your position in the race as well as the position of your opponents. At the end of each sector the gap between you and your opponents will be displayed.
Suspension
[Shift + L] Pressing this key combination will bring the suspension display to the screen. This is a schematic diagram of the car's suspension which is updated in real time so you can view the suspension work through corners and over bumps. This display will also reflect if your car uses a Double Wishbone, Mac Pherson or Trailing Arm suspension.
Latency/Lag bars
They display the amount of latency between you, other players and the server.
Technical: The blue and green bars (which move quickly) represent the number of "game packets" that have been already sent by each player but have not been "used". The game only "eats" game packets when it has them for all players, this is how the game model stays in sync. Going from left to right it starts with the host, then guest1, guest2 etc (as seen in the N list of connections). The green one is your own. When one player lags, you will see his reserve packets are at zero, and everyone else's go up and up at that point, while the game is not able to process game packets. The grey bars are the average of the other players bars, as seen by the other players, and transmitted to your pc for info. Note : car positions come in "pos packets" not game packets - pos packets are not "in-sync" and are processed immediately. How to read the coloured bars:
- all jumping up and down nicely, all have good connections.
- one player keeps getting stuck at the bottom (others rise) then recovering - intermittent lag from that player to host.
- all keep getting stuck at the bottom and only your green one going up - intermittent lag between you and the host (you aren't getting the other players' game packets).
- extreme of (2) that player will time out.
- extreme of (3) you will time out.
- all bars going half way up the screen way above the red zone – bug!
[Shift + F8] toggles network debug mode.
Lista de Conexiones
Esta información se muestra presionando la tecla N, cada vez que se pulsa se alterna entre alias sobre los coches, sin alias sobre los coches y la lista de conexiones. La lista muestra quiene está conectado en el servidor, que tipo de control está usando, permite enviar y recibir configuraciones, y se puede ver la cámara del jugador.
Tipo de control: Está definido con las letras W, M, Kn y Ks. W significa volante, M significa ratón, Kn signigica teclado y Ks significa teclado asistido (el cual el pc intentará proporcionar asistencia de dirección leve en algunas circunstancias). Esta información corresponde a la configuración de cada jugador. Es posible que el uso del ratón, volante/joystick configurado sea real, por lo que no se puede considerar totalmente fiable
Clicando con el botón derecho sobre el tipo de control o el alias de un conductor cambia el tamaño del texto.
